It’s early November here in New England, and as I gaze out my window I should see remnants of leaves that have fallen from trees, maybe a little bit of frost glistening on blades of grass.
What do I see?
SNOW.
Instead of remnants of leaves, I see remnants of a crap-ton (totally a word) of snow that fell two days ago and STILL HASN’T MELTED.
Also, it’s 33 DEGREES FAHRENHEIT. That is, quite simply, NOT ENOUGH DEGREES FOR ME!
My husband, Chris, just left for probably a million mile ride with a zillion feet of climbing…you know, because he’s insane.
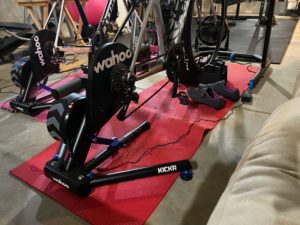
I, on the other hand, live in the land of comfort and heat and will be heading down to my little basement set-up for my daily cycling workout.
You may be wondering how YOU can cycle indoors too! In this article I will share the equipment I use and my recommendations on how to cycle indoors. I will share my thoughts on
1. What kind of indoor trainer you should get.
2. What essential pieces of equipment and accessories you need.
3. Some helpful extras that you don’t absolutely need for cycling indoors, but will make your life easier, more comfortable, and keep you a little less bored.
Honestly, there are many different ways to set yourself up for indoor cycling. My way is not the only way! You can get a Peloton, you can get a spin bike, you can get an exercise bike. Everyone has to look at the pros and cons of each option and figure out what’s best for them.
Ultimately, at the end of the day, pick an option that is the most appealing to you. Do you want to take spin classes in real time and be motivated by others? Get a Peloton/get a spin bike and the Peloton app! Do you want to simulate riding on the road? Get a trainer!
I opted to put my road bike, the same bike I cycle with outside, on a trainer in my basement. I personally wanted an experience as close to actual road cycling as I could reasonably get. The details of this is what I am going to focus on sharing with you here.
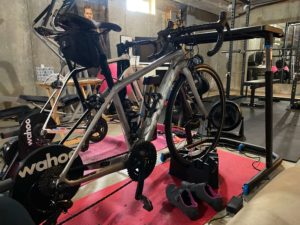
This setup, in a word, is AMAZING. It prevents me from using the weather as an excuse to get on my bike and ride. Because I had a bike fit when my bike was purchased, and my road bike fits me perfectly, this is the best way for me to get time in on the bike without pain.
Here I share all of my suggestions on what you should get if you want an indoor setup that actually makes it easier to get on your road bike INSIDE than it is to get on your bike OUTSIDE!
This is a pretty comprehensive guide, so please don’t get overwhelmed and feel like you need to go out and buy all of the things. I started with the essentials, and then slowly added some items along the way.
The idea is that you want to make your indoor cycling space INVITING so that you come back to it again and again, get those miles in over the winter or in less than desirable weather, and crush your cycling goals!
Please note: This article contains affiliate links. If you take action through these links I may receive a commission at no additional cost to you. I will let you know which products I personally use and love, and which ones I don’t have yet but would love to use one day.
1. What Kind of Indoor Cycling Trainer Should I Get?
My simplest piece of advice is to get a Wahoo KICKR Smart Trainer. There. Done.
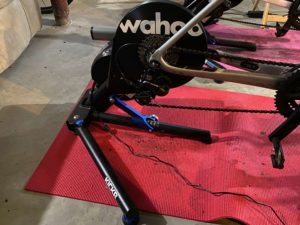
Seriously, though, if you start with this, everything else will likely just fall into place.
My husband and I both use the Wahoo KICKR Smart Trainer. He has an older model that has been going strong for…hrm…maybe 5 years now? And I have a newer model that I have been using for about 2-3 years.
These suckers have been USED, my friends. Chris logs an obscene number of miles on his, and I will say that my winter cycling hours/miles are not too shabby as well.
Neither of our Wahoo KICKR Smart Trainers have ever broken, or have ever required maintenance. They are SOLID. We can absolutely, 100% count on always being able to hop on and get our miles in without having to jump through a bunch of hoops or worry about anything breaking down.
Also, the setup is so easy! I am NOT mechanically inclined, and I can actually get my own bike on and off the trainer with minimal ease. It’s just as simple as removing and putting on your back wheel. I watched a GCN youtube video a number of times to learn how to do that, and am now able to accomplish the trainer setup all on my own.
Me being me, I of course got bike grease all over myself, but I have gotten better at that. Also, I now just put on some gloves so that I don’t have to spend hours scrubbing grease from the chain off my hands.
The Wahoo KICKR Smart Trainer is considered a “smart trainer” because it uses bluetooth to connect to an app (I use Zwift but have used TrainerRoad as well). Smart Trainers will automatically increase resistance for you (say when you are going up a hill).
I require this whole process to be as simple as possible. The less I have to do to get my miles in, the better! This is why I recommend a smart trainer.
The downside, of course, is that the Wahoo KICKR Smart Trainer is pretty spendy. Unfortunately with almost all things cycling it seems you get what you pay for, and this trainer is no exception. Also, when you look at the cost of this trainer compared to a Peloton? Then it’s not so bad!
I should also mention that Wahoo has a few other indoor trainer options. I have not used these myself, but wanted to make sure you were aware of them. A couple are cheaper, and one is way more expensive, but they all are different and have their own pros/cons.
1. The KICKR Core is actually similar to the KICKR and is cheaper. It doesn’t have quite as many features (ones that at my level of cycling probably wouldn’t bother me too much). However, you also need to purchase your own cassette (the thing that you put the chain around), which negates a little bit of the savings since that is included with the KICKR. Overall though you will spend less and get serious bang for your buck here.
2. Additionally, Wahoo has the KICKR Snap which is a wheel-on trainer. This makes it easier to get your bike on and off the trainer since you don’t have to remove the back wheel (though some people do like to get a training wheel if they are using this kind of trainer). Also the KICKR Snap is still a smart trainer, so you can use it with Zwift! And it’s even cheaper than the KICKR Core.
3. Finally, there is the KICKR Bike . Don’t feel like messing around with a trainer? Taking your bike on and off? Have an extra 3500 dollars laying around? Then, by all means my friend, get the KICKR Bike! It is the premiere Wahoo riding experience and it literally does it all. It looks incredibly cool, reportedly does an excellent job simulating the outdoor riding experience, BUT the pricetag is just a little too hefty for me. OK…a lot too hefty! That is the MAJOR downside. Maybe someday…
“OK, I Have a Trainer, What Else Do I Absolutely Need?”
You will also need something to put your front wheel on, a cadence sensor, some kind of mat to go under your set up, and some kind of app/program to run with your smart trainer.
Let’s handle each of those in turn, shall we?
1. Something to Put Your Front Wheel On
Because the trainer raises the back of your bike a bit, you will need something to put your front wheel on. I have this Saris Cyclops Stand which is very budget friendly and does the trick. Some people I have heard use a stack of books, but I wanted to really make sure that the front wheel wasn’t going anywhere.
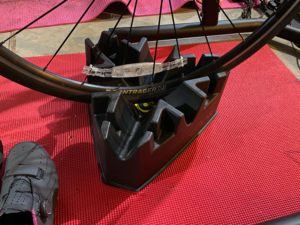
Though the Wahoo KICKR doesn’t technically require a front wheel block, and the trainer can be adjusted for your front wheel to be level with the floor, I personally really like having one for the added stability which is why this is on my must have list.
2. You Will Likely Want a Cadence Sensor
You may already have a cadence sensor on your bike. If so you can skip this step! Wahoo Cadence Sensors are awesome. They are battery operated and the battery lasts a long time. I probably only change mine once a year or so.
What is a Cadence Sensor? A Cadence sensor measures your RPMs (revolutions per minute) on the bike.
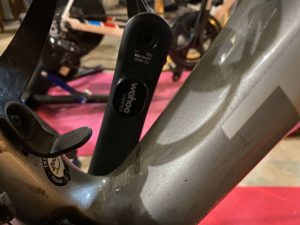
Why do I need a Cadence Sensor? Cadence in road cycling is really important. You want to maintain a steady cadence so that you can conserve energy when necessary.
If you pedal super hard at high resistance early in your rides then you won’t be able to last as long on the bike as you will if you pedal at a higher speed but a lower resistance.
If you have ever been on the bike and felt like you were about to die after 10 minutes…I can assure you a cadence sensor will help with that!
Generally a cadence in the 80-90 RPM range is a good base cadence to shoot for. This will vary somewhat depending on your body type, cycling goals, personal preference, and type of work out you are doing. I am usually on the lower end, and hover in the 75-85 range.
Also, many cycling apps like Zwift won’t be able to give you as much information without a cadence sensor.
3. You Need a Mat for Underneath Your Setup
A mat is necessary to prevent everything from moving around on the floor, and to keep your equipment from damaging the floor if you have a floor you care about.
I use a super cheap yoga mat from amazon similar to this one. I find it does the trick quite nicely! Note the mess..whatever mat you buy or use is probably done for, so make sure it’s one you don’t care too much about!
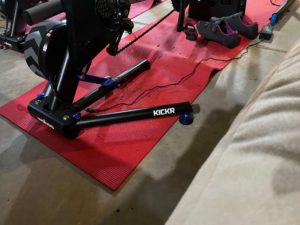
If you want to get fancy though, Wahoo does offer their own mat. It is pretty pricey. I think grabbing a cheap yoga mat is just fine, though I do find it can bunch up a little from time to time and it’s certainly possible the Wahoo mat is better, though I can’t attest to that. After spending many bucks on a trainer I was cool with a budget friendly mat option.
4. You need some kind of app/program to connect your smart trainer to.
There are honestly so many options out there, so please feel free to do your own research. With most apps like Zwift, TrainerRoad, and Sufferfest you pay a monthly fee. There are some that have free options too, like RGT Cycling.
I personally have used TrainerRoad and Zwift, and love them both! I do like them for different reasons/purposes, and currently only use Zwift.

When I was first getting started TrainerRoad was awesome. It’s so easy, and their training programs are great. There are cycling drills that help you learn how to breathe on the bike, stand on the bike, focus on one leg at a time, etc. No doubt TrainerRoad made me a stronger cyclist, and fast. Zwift does have training plans, but I didn’t find anything there that worked quite as well as TrainerRoad.
Zwift on the other hand is much more social. You interact with other “zwifters” and feel like you are actually going somewhere because it simulates riding on the road (TrainerRoad has more of a “I am working through a program on an exercise machine” feel to it). You also have the option of doing a workout, free riding, a group ride, or even a race! There is seriously a lot going on there which is awesome, but it can also be overwhelming to navigate.
What are Some Helpful Extras That I Don’t Absolutely Need for Cycling Indoors, but Will Make My Life Easier, Make Me More Comfortable, and Keep Me a Little Less Bored?
1. An iPad to Run Your Indoor Cycling Program
Most apps can be run on a computer or a phone, but I personally really like using my iPad for this. You don’t need anything fancy, just a base level iPad and a relatively cheap case will do. I like the bigger screen with the iPad than what I get on my phone, and also it leaves my phone free so that I can give thumbs ups with the zwift companion app!
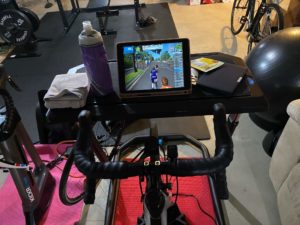
You may think I am crazy, but I truly bought my iPad just for this purpose. I ran into issues connecting my laptop to my trainer and Zwift so I went out and got the iPad. Can’t say I have regretted that impulse buy at all.
2. A Fan
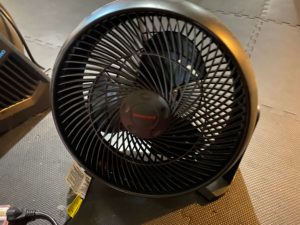
I am putting this item near the top of the optional list because I almost put it in the required items. Cycling indoors is freaking HOT. You will sweat, a lot. A fan makes it so much more bearable.
This is the cheap fan I use that I got on Amazon. It works great!
Now THIS is the fancy Wahoo KICKR Headwind Bluetooth Fan my husband Chris uses. It’s amazing. Chris used the same fan I did until he got this bad boy and he certainly is NOT complaining. He may have even bragged about how awesome it is a tiny little bit. It doesn’t even turn on at first…you know when you are still too cold for a fan? It turns on automatically right when you start to need it!
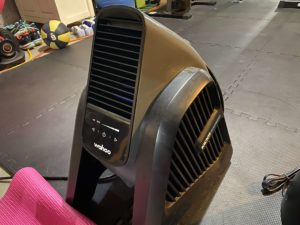
The KICKR Headwind Bluetooth Fan automatically adjusts to your effort level. That is one incredible fan. Like the Wahoo Bike though, the price point was just a little too high for me. And to be fair a bit pricey for Chris too, so I suggested his mom get it for him for Christmas. I am an awesome wife, I know :).
3. Heart Rate Monitor
If you want to have a sense of the effort you are putting out as well as more accurately monitor your calorie burn, a heart rate monitor is super helpful. I have personally used 3, and will rank them in order of preference here so you have some choices. Who doesn’t love choices!
1. TICKR Fit Heart Rate Monitor: This one is my favorite, because 1. It’s an armband and 2. It’s rechargeable. I just hate having something around my chest when I am riding. I feel like if it’s too loose it falls down, and if it’s too tight I can’t breathe. Supposedly the armband ones aren’t as accurate, but I honestly haven’t had a problem or noticed a difference.
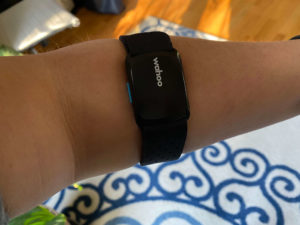
I suppose you could get a funky tan line with the armband one, but I usually have a long sleeve sun jersey to protect me from the sun anyway. It goes right over the arm band.
2. TICKR Heart Rate Monitor: This is just like the one above, but it’s a chest monitor. My husband has this one and loves it, though he has had to replace the band on it. He rides a lot though, so that’s kind of to be expected. I found that I had a hard time getting it to sit flat on my chest, and again, I just don’t like chest monitors because it’s a production to put on if you forget and I struggle with breathing.
3. Polar H10 Heart Rate Monitor: This monitor was great, had a great strap, and was very accurate. BUT it died completely after a couple of months. Chris also had one, and it also died after a couple of months too. People swear by it, so maybe we both just were unlucky, but because of this I would personally stick with the Wahoo Heart Rate Monitors.
4. KICKR Indoor Cycling Desk
This is DEFINITELY optional, especially if you are using a TV on a wall or something for your indoor experience. Because I use my iPad for Zwift, I love having this cycling desk! I hated the price tag, but like to have all of my things right in front of me and easy to reach when I ride.
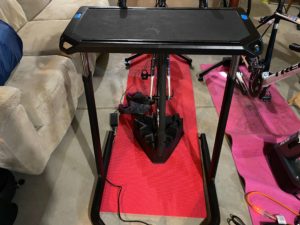
This was one of those things that just wasn’t worth the cost for Chris, he just has a little TV tray that he puts his stuff on. The tray is low though, and he has to look down to see his iPad. I have actually seen him set up his iPad on my cycling desk from time to time though, so I think he likes it as well!
5. The KICKR Climb
Another item on the spendy and definitely optional list. It is worth mentioning, though, because it helps simulate riding on the road! If you aren’t going all out for the KICKR Bike, then check out this option. It actually moves your bike up and down when you go up and down hills.
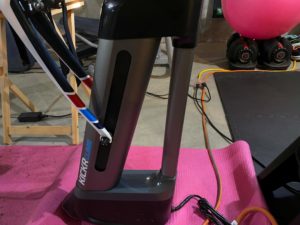
Pretty much the KICKR Climb is great for making your indoor rides more interesting. And if you have the extra cash, why wouldn’t you want that? This is another one of those items that we got Chris for Christmas because it wasn’t the kind of cost he could justify for himself.
6. A Sweat Towel
This item is options AND cheap! Sweat towels indoors for me are really nice. I sweat, a lot. Even with the fan! This way I can keep the sweat from running down my face incessantly, which is annoying AND gross.
These sweat towels are similar to the ones I have from Amazon. I like that they say “fearless” on them! Who wouldn’t want a little sweat towel motivation!
5. A Headband

Headbands are not 100% necessary, but are SUPER helpful. I like these relatively cheap Nike Headbands that you can get on Amazon. They are relatively cheap and aren’t too constricting. I get headaches really easy, so I can’t have anything that puts too much pressure on my noggin. Also I am kind of a sucker for the swoosh, so that’s another reason why I like these.
Well, there you have it! These are the indoor cycling products I either use or covet.
I hope that you found this list helpful and useful! If you have any questions about any of the products I recommended, or about anything that you need, please feel free to drop me an email at [email protected] or comment below.
I would love to hear from you, and I am here to help! I want you to get all of the things you need, and of course, some of the things you want, to have an amazing indoor cycling setup.
Ride on!
xoxo
Stacy

Great write up! We are waiting for our KickR’s.
Nice!!! That’s awesome. You are going to love them!!! So glad you liked the article too!